 Yes, my husband has dreads. Yes, he washes his hair. No, he doesn't smoke pot. Yes, he has a job. We get so many questions about his hair that I thought I would write a quick blog post regarding the basic making and maintenance of dreads. If the thought disgusts you, please feel free to skip this post!
 First of all, I never thought I would date, let alone marry, someone with dreads. I know that sounds incredibly judgmental, but hey, it's the truth. I am sure God got a good chuckle while I was growing up every time I said how gross they were. He found me an honorable and respectable Christian man who adores me - who cares what his hair looks like?! Now I am so used to them that I hardly notice them unless someone points them out or I am actually working on them. I just see my dashing husband! I even like them now. I actually met my husband about a month after he started the dreading process and I took over on maintenance from there, but I will go through the steps with you from the beginning. My husband has silky-soft, stick-straight blond hair, but it is really thick. Hair with more texture is much easier to dread.

GETTING STARTED
- Grow out your hair. I have heard that you can dread hair that is at least 3 inches long, but I would recommend letting it grow longer than that. The longer hair worked better for us. I think 6 inches is probably the minimum length that I would recommend if you want your dreads easier to put in and maintain. How long does it take to grow it out? That varies from person to person. My husband's hair grows very quickly.

- Wash your hair with residue-free shampoo. You don't want stuff stuck in your dreads, and any residue can lead to nasty build-up. You do not need to dry it before the next step.
- Section off your hair with tiny elastics. This is the step in the process that you really don't want to rush. I recommend having other people do this for you, since they can see and access your entire head easier than you can. Pick people you trust, ideally people who don't hate dreads. Each section will be one lock, so pay attention to things like where the part is (if you decide to have one) and how consistent they are in size. Sectioning determines if the dreads will be offset or more like a grid. It also determines the shape of each dread. If you need to make adjustments because some dreads have more hair in them than others, make that adjustment at this stage to save yourself grief later. Pay close attention to the dreads along the part and hairline around the forehead especially, since they are very visible. I had to divide one of my husband's dreads that was right along his forehead because it was huge and right there, front and center. I wish I could have done the original sectioning myself, but if I had met him before dreads, I am not sure I would have followed through with putting them in, so it is probably good that I wasn't there.


- Spray with Locking Accelerator if you have it. My husband purchased his supplies from Dread Head HQ online. Locking accelerator does just that - it accelerates the process. Can you still make dreads without it? Absolutely. My husband bends forward and flips his hair forward so that he can spray his hair without getting it on his scalp.
- Tease, or back-comb, each section down toward the scalp. Again, you will need lots of help for this part. Start with the dreads that are not in prominent locations, for practice and once you have perfected your technique, do the visible ones. Remove the scalp elastic. Pull the lock out straight, comb the hair slowly backwards on itself, toward the scalp, working from the scalp toward the end. Let the hair slowly be pulled back to the scalp by the comb. You want them to be round, rather than flat strips, so be conscious to change the angle at which you are combing. Work the hair like this until you get to the end. Then put an elastic on the bottom to hold it in place. This is very time-consuming and most painful part of the process.

about a month and a half later - Wax each dread. My husband purchased beeswax specifically marketed for dreads, but I think any beeswax would do. I put about a teaspoon, maybe a little less, on my palm and warm it up by rubbing my palms together. Then I roll the dread vigorously between my palms from the scalp to the tip, rubbing the wax into the dread and sticking loose ends to the dread. You can feel when you don't have enough wax, trust me. When dreads are new, the more you roll them between your palms, the better. It helps them form into rope-like dreads. Yes, you leave the wax in the dreads. Yes, you can feel it. If you can see chunks of it, you used too much and didn't roll them long enough.


 |
| had dreads for 7 months |
MAINTAINING DREADS Maintenance used to take me about 8 hours every few weeks. Now I put in only 3 or 4 hours every few months.
- Keep them clean. For goodness sake, try to keep your hair out of dirt and car grease and away from paint. That stuff is hard to get out of dreads. Put a bag or bandana over them if you must, but please, keep them clean. Wash them with residue-free shampoo, much like you would wash out a sponge. First, get them wet by squeezing them under the water and letting them suck in the water like a sponge would. Then, rub and squeeze the shampoo into them using the same method. Remember that dandruff is a common issue with dreads because your scalp is harder to clean, so take your time shampooing your scalp really well and using your fingers and fingernails to get any loose cells out of your hair. A good rinsing with the same method leaves them clean. You can repeat the process if necessary.
- Don't leave them wet too long. Remember that wet towel you left in a plastic bag once? Remember that smell of mildew? Don't do that to your hair. They take a long time to dry. You can do your best to shake them out and squeeze them in a towel, but I wouldn't rub them with a towel. I recommend leaving them as free as possible after showering and swimming, rather than bundling them into a ponytail. When they are still damp from showering, you can use Locking Accelerator, just like in the initial process of making dreads. My husband doesn't bother anymore because he doesn't need it.

- Every so often, pull in the loose hairs. I have a latch-hook that I use for this process, just like the tool used for hooking rugs. When we were just starting, it would take me 8 hours to go through all 89 dreads with the latch-hook and wax. Basically for this step, go through the dreads and make sure they aren't stuck together. If they are, gently rip them apart. Then, start at the scalp, finding any loose hairs sticking up and figuring out which dreads they should belong to. Then, stick the latch-hook into the dread and push it toward the scalp, down through the dread. It works best to zig-zag a bit so the hair has something to hold on to so it won't just slip back out. It helps to hold the dread out with some tension. At the scalp, catch the loose hairs in the latch hook and pull them up into the dread, repeating as necessary along the dread until the end. We chose to make the bottoms rounded by pulling the ends up into the dreads, but not everyone does this.

- Wax. We used to use wax on his dreads, just like the last step in the process of making dreads, but we stopped that after about a year or so. Now it is unnecessary.
- Don't cut anything. Many people ask if we cut his dreads or the loose hairs on his scalp or sticking out of his dreads. No, we don't. Don't do it.

- Don't share hats/helmets/earmuffs etc. This may be common sense, but getting lice and nits out of dreads would be a nightmare, if not impossible. If someone you know has announced that they have lice and you are feeling nervous, you can wash your hair thoroughly with dawn original blue dish soap a few times over the course of a week or so and hope for the best.

one year from putting in dreads


 |
| My husband let me braid it for the sake of pictures, in case any girls out there wonder what braided dreads look like. |

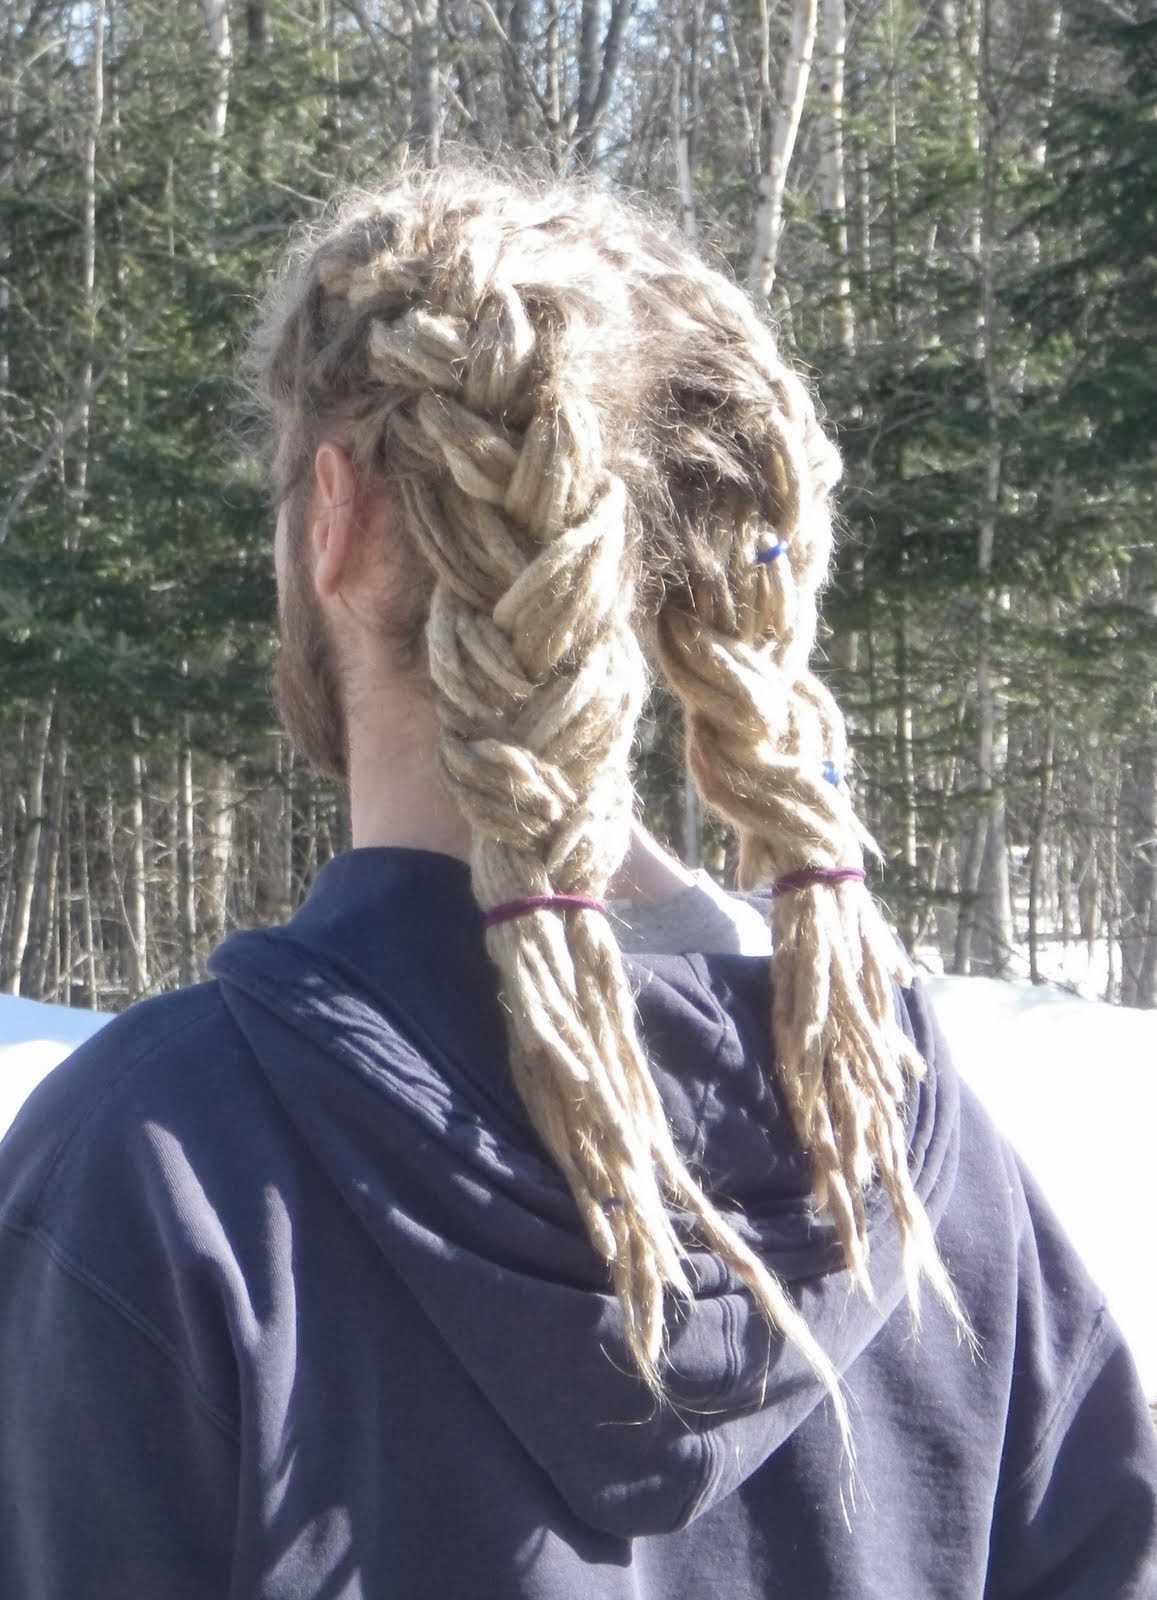 |
| my husband doesn't wear his hair in braids like this, for clarification |

Please do not braid his hair...unless you are teaching Astrid to braid ;). I am a fan of the dreads, even though the hubby is not.
ReplyDeleteHe never wears it braided...I just wanted to show you how thick it is, and how bleached the ends are from the sun. I think braiding it really shows the contrast.
DeleteThanks for sharing. Very interesting process. So glad that Jeff shaves his hair with a #2 blade and all I have to do is the touch ups. I don't think I would want to take the 8 hours out of my day to work on hair. Than again, one only knows if they try, right? Great job!
ReplyDeleteThis comment has been removed by the author.
ReplyDeleteWe waxed for about the first six months. His hair was so silky soft and straight that the wax helped to keep it together in dreads. I think it could get gross if you use too much, but using a little worked well. 4.5 years down the road, the wax was long gone and unnecessary.
DeleteReally nice dreads.
ReplyDeleteAbsolutely Amazing looking and well done for being an individual 😎🤟
ReplyDelete