Tuesday, February 26, 2013

How I make my own cloth wipes and a review of the OXO Perfect Pull Wipe Dispenser


We made the decision to use cloth diapers long before I was even expecting our daughter, but the decision to use cloth wipes was only a matter of months before she was born. My mother had used washclothes as wipes with my younger siblings. I had seen cloth wipes for sale online. I don't know why I was so hesitant! I started comparing cloth wipes that are available for sale online. Based on reviews, I added Charlie Banana double-sided wipes to our baby registry. I didn't receive any cloth wipes as gifts and $12.99 for 10 wipes was too pricey for me to purchase! However, I did receive 16 flannel receiving blankets as baby shower gifts. My husband convinced me to cut them up and make my own flannel wipes. I chose to make single-layer wipes but you could easily double the pieces up to make double-layered wipes.

HOW I MADE OUR WIPES
So, here's how I decided how big to cut the wipes: I folded the blanket up smaller and smaller until it looked about the right size to be a wipe. Then I unfolded it with that size in mind. I cut the blanket in half. Then I cut each half into four pieces, so I had 16 wipes from one blanket. It wasn't very scientific, but I didn't want to waste any of the blanket. They are just slightly smaller than commercial wipes. Then I used my sewing machine to quickly zig-zag the edges so that the flannel won't fray or ravel. If I had a serger, I would serge the edges.


HOW WE USE CLOTH WIPES
Okay, so that sounds like a silly heading, but it really isn't. There are lots of different recipes for making your own wipe solution on the web and people use cloth wipes many different ways. When our daughter was very little, we lived in a house that had a sink conveniently located within reaching-distance from the changing area, so I kept the dry wipes folded in a neat pile (or thrown on a heap at the end of the changing pad) and ran them under warm water one at a time as needed.

When we moved to our new house, the changing area was in my daughter's bedroom, far from a sink, so our strategy had to change.
  • At first I tried keeping the pile of dry wipes on the changing table with a spray bottle of water mixed with a few drops of tea-tree-oil. It quickly became clear that this method wasn't making the wipes wet enough for our liking. I even tried using the spray directly on our daughter's bum and wiping her with a dry wipe. It wasn't working well.
  • Some people have succesfully stored their cloth wipes in re-used plastic wipe boxes from disposables. We tried that. I wet the wipes in a bowl of water with the littlest splash of tea-tree-oil and folded them into the old wipe box. Here's what happened: If the box was full it worked fine, just like disposables. When it got below half-full, things changed. I would grab the top wipe, and as I pulled it out through the hole in the top of the container, two or three other wipes would try to hitch a ride too and I would be standing there with one hand on my baby and one hand trying to shake the box hard enough to make it fall so I could get the wipes out. I thought that maybe it would work if the container were heavier. I didn't want a wipe warmer.  I started looking online for a heavier container that would be the right size.That's when I stumbled across the OXO Tot Perfect Pull Wipes Dispenser on amazon.com. It was $19.99, which was expensive for a container, but it was sooooooo cool! I will explain review this wipes dispenser below in detail.

When the wipes come out of the dryer, I fold them like this, alternating directions. That way I always have an edge to grab through the hole in the weighted plate. Then I wet the entire stack in water with a few drops of tea-tree-oil (to keep them from mildewing) and squeeze the extra water out. Then I put the entire stack into the wipe dispenser and we are ready for business! When I am changing a diaper, the wipes are accessable with one hand, pre-dampened and ready to use! It is so easy! When clean and prepared wipes are ready to be added to the dispenser I put the fresh ones on the bottom, so that the older ones get cycled through and used first. I do keep a pack of disposable wipes in the diaper bag to use when we are away from home. We put the used disposable wipes right into the wetbag and eventually washer and dryer, just like the diapers. They come out of the dryer mostly intact and I throw them away. We tried the dry-wipes-and-spray-bottle method in the diaper bag for a while, but we felt that it was too much of a production for each diaper change.

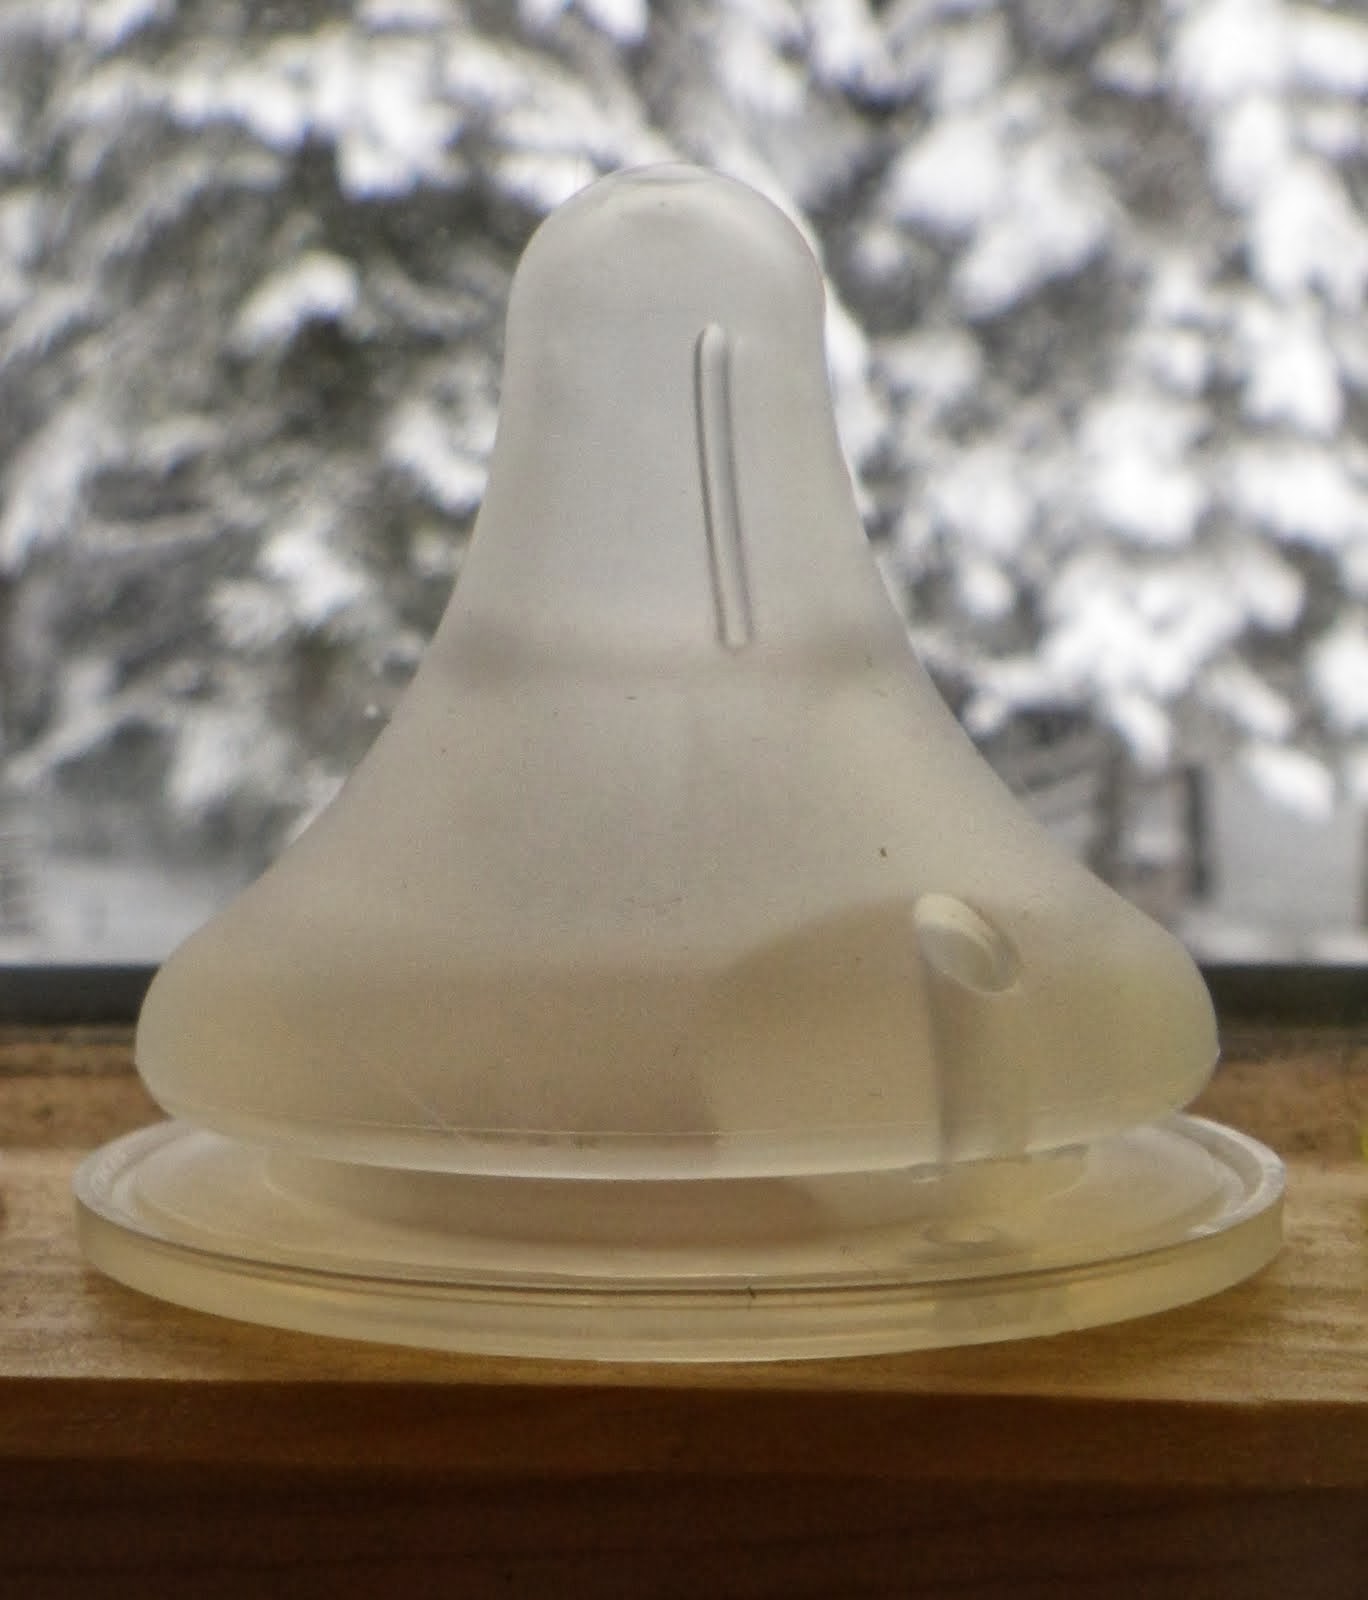
REVIEW OF OXO TOT PERFECT PULL WIPES DISPENSER
This is a luxury wipes dispenser. Someone obviously put a great deal of thought into the design and engineering of the product, and it works like a dream! The cover can be opened with a light push to the front center of the cover. The cover then opens itself to reveal a silicone gasket around the cover, to keep the moisture in the box. Inside the container you then see a weighted plate that rests on the wipes. When you pull the top wipe up through the hole in the plate, the plate keeps the remaining wipes in place! Brilliant! As you use the wipes, the plate continues to rest on the wipes, so it works just as well for the last few wipes as it does for the first. There is a clear plastic window in the center of the front of the box, so you can see when the wipes are getting low, without opening the container. Simply push the cover down to close the container! The wipes dispenser has non-skid feet on the bottom, so it stays in place and doesn't scratch the changing table. The container itself is a sleek, sturdy, and shiny white plastic with a choice of four different accent colors: aqua, green, orange or pink.  I wanted the pink because it is such a pretty shade, but we bought green because my husband liked it and his opinion does matter to me!

I think we have a pretty good system at this point! I am always interested in what other people have figured out regarding diapers and wipes, so feel free to share your system!!

It is important to note that I am not in any way associated with the OXO company. I bought the product myself and my opinions are my own.

Friday, February 22, 2013

Why we use Cloth Diapers

About six months before getting pregnant, I started my research on cloth diapering. What I discovered was eye-opening. Now that we have had personal experience with cloth diapers, I feel ready to share both my research and my experiences.
 
  • MONEY According to my research, it generally costs and average of $2000 to diaper one child in disposable diapers for 2 years. Basically, any cloth diapers will save you money unless you are an extreme couponer. Using flats or prefolds and covers is by far the cheapest way to go, but even if you spend $500 on cloth diapers, you will still be saving a lot of money in the long run- especially if you are going to use them on future children as well. You can also buy cloth diapers used and sell your used diapers as well. Here is a Diaper Calculator on the Diaper Pin which helps you specifically compare the cost of cloth diapering versus using disposables. This calculator is neat because it does factor in the energy and water costs for cleaning the diapers, and the cost of using a diaper genie to hold disposables.
For my husband, the money alone was reason enough to cloth diaper.
  • GARBAGE  If you are putting 6-12 diapers per day into the garbage, that is going to add up fast. Here in our town, we have to take our own trash to the transfer station and pay a fee per bag. In households that use disposables, diapers usually make up HALF of the their trash. Also, diaper trash really stinks, even if you have a separate trash for diapers.  Even using disposables, it says on the package that solid waste should be flushed down a toilet, but who does that? When you roll poop into a plastic diaper, it doesn't make it easy for it to break down in a landfill. No one knows for sure how long they will take to decompose, but 500 years from now, those diapers could very well still be there with the poop still festering inside. Talk about gross. There are more details and figures if you look up Real Diaper Association. Cloth diapers will eventually decompose in a compost heap, after being used many times, possibly for many different children.
Again, my husband was on-board with this one, since he is the one who deals with our garbage.
  • RASHES and BABY HEALTH The pediatrician at the hospital was very happy to hear that we were going to be using cloth diapers because it would cut down on occurrences of diaper rash. He said that in his home country (wish I could remember which country) diaper rash is unheard of because everyone uses cloth diapers. A cloth diaper, especially when using a wool cover instead of rubber pants or PUL/TPU diaper covers is more breathable than a disposable diaper. We have had very few rashes, and all of them were because she pooped without us noticing and she sat in it for a few hours. If we know that she has pooped, we change her right away, just like we would with disposables. When she has rashes, we use Grovia Magic Stick and it is usually gone overnight. We go through 5-8 cloth diapers per day and I wash every 2-3 days. I don't know what chemicals are in a disposable diaper, but just watching the disposable diapers at the pool fill with water and then have gel coming out, it can't be good. With cloth diapers, you know exactly what they are made of.

  • BLOW-OUTS, WET SHEETS and TOUCHING POOP  I don't know anyone who likes touching the contents of a diaper. One of my favorite things about cloth diapers is the elastic along the back that holds everything inside. Blow-outs can still happen, especially with user error, but they are very infrequent with cloth diapers. I can only think of 3 good blow-outs that my daughter has had, but I have seen many diapers that would have been blow-outs if she were wearing a disposable diaper. I knew that I was sacrificing some functionality for trimness in the diapers I chose for daytime use. Our night diapers are absolutely bullet-proof. Maybe we will purchase some more workhorse diapers eventually.
  • We have had diapers leak pee because of wicking if the cotton or microfiber from the inside of the diaper was sticking out of the waterproof part or somehow making contact with her clothing, but that is entirely user error. At night and during naps we cover her diaper with a lanolized wool cover (more about that in a separate post later) and we have never had a leak through wool. The wet sheets I have changed have been from spit-up. I do put a hemp doubler in her night diaper because she goes all night in one diaper (she doesn't poop in her sleep). We use stay-dry diapers (diapers lined with fleece or something similar) at night so that she doesn't feel the wetness. I can also feel confident bringing her into my bed if I am desperate for sleep because I know that I can rely on that wool. The worst that can happen is poop leaks onto the cover and I need to wash the cover, and that is very, very rare. Wool is seriously awesome - more about that later. Think about your car. Your regular tires are pretty reliable, but every now and then you do get a leak or a flat and you may have to change them out for the doughnut tire in the trunk. Disposables are like the doughnut tire. You can't trust it at 65 on a highway, but it will hopefully get you home or to the garage. We actually keep a package of disposables in the trunk of our car, just in case we run out of cloth diapers away from home, and we have used them. We also change her into a cloth diaper as soon as we get home.
  • We also don't swish our diapers in the toilet. Gross. I have had so many people as me about that. I guess some people do it, but I don't want my hands in the toilet, nor do I want to touch poop, thanks. Our baby is still exclusively breast-fed, so her poop is water-soluble. That means that we don't have to clean the poop off the diapers before washing them or putting them into our dry diaper-pail. At the beginning of my wash cycle I do a cold rinse and that takes care of the poop. When she starts eating solid foods, we will start using our diaper sprayer. Basically you spray the poop off the diaper and into the toilet, so you don't have to touch it. If we didn't have a leech-field we could use flushable liners in our cloth diapers, which are even easier. With liners you just plop the poop and liner right into the toilet and flush.


  • CONVENIENCE If you travel a lot and are rarely home, washing diapers might not work well for you, but for us it is far more convenient to toss some diapers in the wash than to go to the store to buy more at the local grocery store or order them online and pick them up at the post office (most delivery companies won't deliver to our road). We do live about 1 1/2 to 2 hours away from Walmart or Target, so we would be at the mercy of the local grocery store. Yes, we do use a special cloth-diaper-friendly-soap, and we do order that online. I have about 12 prefolds and 3 covers that I only use if all of my other diapers are dirty or not on the shelf when I need them, and that is my safety net to make sure I don't run out. For example, if we have a really bad storm and the power is out and I can't get the generator started (which is possible here), I may need to use my prefolds, or worst-case scenario, get some disposables from the trunk of the car.  When our washer broke, I did successfully wash diapers by hand in a bucket for a while before friends offered to let us use their washer, but I wouldn't choose that on an everyday basis.

These are the main reasons that we chose to use cloth diapers, and we are very happy with our decision. On a side note, cloth diapers also feel like they would feel better, if that makes sense. And they can be pretty cute. I understand that it is not convenient for everyone to use cloth. I will be writing several posts later about the specific cloth diapers we use and how I wash them etc, but if you have any questions, please feel free to ask and I will do my best to answer them. I can take pictures of what I have too.


Do you use cloth diapers? Why or why not?

Thursday, February 21, 2013

Teething babies: Highlighting Razbaby teether, Freshfoods Fill and Freeze pops, and Nuk Orthostar

My baby girl was only 8-weeks-old when her first little tooth cut through her gums. She couldn't really effectively hold a teether to her mouth yet, but she needed something to soothe those gums. We had a couple of liquid-filled plastic teethers in the fridge, but she wasn't able to use them without help. What's a mum to do?


I called my mother on the phone. She suggested freezing some damp washcloths. I did. I tried baby washcloths and regular wahcloths, folded into different shapes and thicknesses. The baby lost interest with them very quickly and all of her clothes ended up very wet.


I looked online. I came across a silicone teether that looked like a bumpy pacifier, called a razbaby. It was around $3, so I thought I'd give it a try. We bought a pale pink one but they come in many colors. While it is now one of her favorite teethers as a 9-month-old, her little mouth at 2-months-old was too small to fit the nipple in. We could get the nipple in her mouth, but she looked like she had a tennis ball in her mouth - she couldn't do anything with it because her mouth had no more room. The best she could do was to chew on the handle with some help holding it there.
size comparison of NUK orthostar and Razbaby

She chewed on our fingers and knuckles. She chewed on her own fingers. She chewed on her pacifier. Then it came to me - why not make her own pacifier into a cold teether? I tried it with just two at first to see if it would work. She using NUK orthostar pacifiers, the ones made completely of silicone. I filled the nipples with water and carefully arranged them in the freezer so as not to spill the water out. A few hours later, I could tell that it was a success. She could fit it
in her mouth and keep it there, chewing on the nipple for all she was worth until the ice eventually melted and the water ran out, and then she just had her pacifier.


you can see how the edges of the holders pop together
pop propped in freezer

Fast forward to when her second, third and fourth teeth were coming in. By that time she was able to hold onto teethers and she was a fan of her fridge teethers. I used some gift cards to buy a Freshfoods Fill and Freeze Pops which I then made breast milk-pops in. I read several reviews about this pop-maker before making my purchase and so I knew that they four pop-holders were detachable, but often break when trying to get the pops out. Because of this, I took the four pops apart before filling and freezing. To facilitate freezing in an upright position, I used a kitchen towel in the freezer door to prop the pops upright as they froze. Once frozen, the towel was unnecessary. My daughter LOVED and still LOVES the breast milk pops. I knew that she was ingesting the same thing that she always eats, but to her, it was a very special cold treat. Now she sometimes points at the freezer, and I knew that she is asking for a pop. The handles are easy for a baby to hold and they are almost rubbery on the inside for extra grip. I think we started using them for our baby at around 4 months, maybe a little earlier. They are just the right size to keep her busy for quite a while without wasting too much milk. Despite the drip-catching design, she does get melted milk all over herself, so a bib is essential. Once she is eating "real" foods, we can make puree pops with fruits and veggies, and I already know that they will be a big hit with her.

The holes in the stick hold the pop in place very well

Wednesday, February 20, 2013

How to get things done around the house when you have a little baby: Review of the Moby Wrap


Having grown up in a house with babies and small children, I learned how to do a lot of things with a baby on my hip. I watched my mother do amazing things in the kitchen with a baby in her arms. However, there are some things that you just need two hands for. If you are a mom, you have probably been there. For example, when washing dishes it takes SIGNIFICANTLY longer when you have one hand. Some people will tell you to put the baby on the floor, in a swing, car seat, or bouncy seat. I do think that there is a time that is appropriate for baby to be on the floor, or to use baby swings, car seats, and bouncers, but my baby doesn't like the swing, we use the car seat as little as possible, and I usually put her in the bouncer when I'm in the shower or eating soup and really can't hold her. I don't want her to get a flat head and honestly, I just want her with me so I can smell her and feel her and talk to her...but dishes don't wash themselves. Don't worry folks, this is where baby-wearing comes in.

You have probably seen baby carriers before. I was familiar with standard front-packs and the aluminum-framed Gerry carrier that mum would put us in - used much like a backpack. I actually have fond memories of being carried in mum's backpack...well, I remember putting my feet on the bar in the back and trying to stand and her telling me to sit back down or she would have to take me out of the backpack. I had never seen a wrap carrier when I was growing up. Basically, it is about 5 yards of fabric that is can be wrapped around your body in a number of ways to form a very comfortable, secure, and adjustable baby carrier. When I was putting together my registry, I spent a good deal of time researching wrap carriers and deciding which one would be best for our family. I read numerous reviews and blogs and watched you-tube videos of people putting on the wraps and using them. I thought about making my own wrap carrier by serging the edges of five yards of fabric, but decided against it once I saw the price of fabric at the store that wasn't even as nice as "real" wrap fabric. Also, I don't have a serger. After much debate, I decided on a Moby Wrap, and I have not regretted that decision.

The biggest reason that I chose the Moby Wrap is because it is a slightly stretchy jersey-knit 100% cotton material, much like a sturdy t-shirt, but the fabric is thicker and sturdier than most of the other wraps on the market. There are woven wraps, and people love them, but I wanted  my baby carrier to have the comfort that comes with a stretchy carrier. It comes in organic cotton, prints, designs, a modern color palette, and a UV protection material as well. Mine is the original. The Moby is a wide piece of fabric and crosses over the shoulders and across in the back, so baby's weight is evenly distributed across your shoulders and back, so you can wear your baby for hours and hardly notice. The Moby Wrap is absolutely awesome for newborns, and even at 9-months, my baby girl still loves it. Our daughter was notorious for falling asleep in the Moby Wrap, sometimes within mere minutes of putting her in. She loved the secure feeling of the wrap around her, and being so close to mum, daddy, or auntie. The theory is that the wrap is reminiscent of the womb, much like swaddling is, but unlike a swaddled baby in a crib, the baby still feels mum breathe, walk, and talk etc. It makes sense that she'd love it! It can calm fussy babies right down. Some babies with digestive or gas issues do really well sleeping upright in the Moby even if they can't sleep laying down in a crib. For extra skin-on-skin time around the house with baby, you can use the Moby Wrap with baby in just a diaper and no shirt between you. Using the newborn hug hold (as shown in the first picture in this post), there is a minimal amount of fabric between you and baby, and baby can keep her legs frogged up together under her the way that she likes them instead of forcing her to keep them apart! The Moby Wrap covers enough of your skin that around the house, you aren't revealing much besides your armpits, and some of your back. You can even nurse in the Moby Wrap!


Is the carrier safe and secure? Absolutely. I would suggest practicing putting the wrap on a few times in front of a mirror to understand the mechanics and make sure you have it right before you put the baby in. Some people have expressed that wrap carriers are confusing and hard to use, but I disagree. I think that a wrap is very intuitive to use and there aren't any clips, clasps, straps or adjusters. As with any baby carrier, there is always room for human error, so use common sense and make sure that baby is in the carrier properly and can breathe easily with her face visible at all times. If it is on correctly and tight enough and the baby is in it properly, you can have both hands free and still have baby super close! There are many ways to use the Moby Wrap. We use the hug hold now, but we loved the newborn hug hold when she was tiny. There are detailed instructions available here on the Moby Wrap website. If baby is sleeping, you can secure her head with fabric too, making sure that her face is always visible and close enough to kiss. In the picture of my husband to the right, you can see that the baby has slid to the side slightly after a long afternoon in the woods, but her face is up and visible (to him, not to us) and her head is supported by the wrap. The Moby Wrap is also machine washable - ours has been washed several times and still looks new. I do find that it is hard to eat neatly in the Moby Wrap. When I was trying to eat a dough boy at the fair, my poor girl ended up with quite a bit of powdered sugar in her hair.

The Moby Wrap is not bulky, so it works well for walks outside in the fall and winter when you might need a fleece or a jacket. I usually put the wrap on first and once the baby is in it, I put my husband's coat over both of us. She is secure and warm and all she needs is a hat. It does get hot and sweaty using a Moby Wrap to hold you little heater close in the hottest part of summer, so use your best judgement to make sure that you and baby don't overheat!

Wraps are also great for carrying your baby in crowded areas, like family reunions. My daughter can only handle being passed around so much before she gets overstimulated and cries. When the baby is in the carrier, people are far less likely to ask to hold her, so I don't have to say "no" quite as much. Sometimes I'll have her start out in the wrap and then take her out once she is used to her surroundings, other times I will pass her around a bit and put her in the wrap when she is done. The same wrap can be used my my sisters or my husband without messing with adjustments, since we put it on "from scratch" each time. There have also been times that the wrap has functioned as a piece of cloth - whether it be a blanket, a nursing cover, or a changing pad.

The Moby Wrap can be used with newborns up through 45lbs.  Personally, I doubt that I will still use it for my 45lb daughter because I prefer using soft-structured buckle carriers for toddlers, but that is a topic for a separate post. I really feel that the wrap is unbeatable for newborns and small babies.

Do you wear your baby? What carriers do you prefer?


It is important to note that we received our Moby Wrap as a baby shower gift from our friends. I was not compensated in any way for this review and I am not associated with the Moby Wrap company. My opinions are my own. Thanks!

The bottle made for breast-fed babies: review of Lansinoh mOmma

My baby is breast-fed, but I do work half-time and so she does need a bottle around 9:30 while I am at work. Before I went back to work from maternity leave and summer vacation, we tried giving her a bottle a few times, without much success. Sometimes it would work, but mostly she would chomp on the nipple and cry or end up choking when milk came out too fast. She had a very hard time transitioning back and forth between nursing and bottle-feeding. We started off using the evenflo glass bottles with silicone nipples. I now use those bottles for pumping. I started looking online for something better for my daughter.

In my searches online I came across bottles of all shapes, sizes and colors. If you have searched for bottles for breast-fed babies, you probably know what I mean! I eventually discovered that Lansinoh has a line of bottles and cups designed to reduce nipple confusion. There were many different options to pick from, some were bigger and some had a weighted bottom so that the bottle/cup couldn't tip over (think of weebles). I bought two of the regular 3oz bottles to try out.
The difference is amazing. She is able to suck the same way she does when she nurses, and the hole is very small so she still has to work for it. It does have a vent, so she can keep eating without taking breaks. I can clean the entire bottle with hot soapy water and a dishcloth and I can reach the inside corners without a bottle brush. The bottle has a cover that pops on and off and stays well. I like this because I can throw an empty bottle into the diaper bag to take it to the babysitter's house and the nipple won't attract fuzz.
 
I have to say that this bottle is not without flaws: I do have to screw the cover on tightly to avoid leaking. Also, the babysitter has expressed frustration more than once that she can never get the last bit out because of the round shape of the bottle. I honestly intended to only use glass bottle because even though plastic can be BPA-free, there might be other bad things in it that we don't know about yet. These bottles are made out of plastic, so I do have that hesitation. I wish that Lansinoh mOmma made the same peristaltic nipples to fit on any standard bottle or standard wide-mouth bottle, but they don't.
 
Cool things about this bottle:  you can buy different tops to change the bottle into a silicone sippy and then a hard sippy and then a straw cup, so you can get a lot of mileage out of your purchase if you plan to use sippy cups. I plan to go straight to a real cup for the most part.  I also really appreciate the fact that they are produced by a company that encourages breastfeeding. I buy nursing pads and milk storage bags from them. Overall I definitely recommend this bottle, despite the minor drawbacks. I really look forward to seeing what else this company develops in the future!


It is important to not here that I purchased the bottles myself and that I am not in any way associated with the Lansinoh Company.


Smelling like a *clean* human: Using Baking Soda as deodorant

 
A few months ago I was getting short on deodorant. I had to make a decision. I could go to the local grocery store and buy whatever they had in stock at the moment or I could wait until I had a chance to drive 2 hours to a store that carried my favorite deodorant and try to minimize body odor in the meantime. Since gasoline is fairly expensive right now, and I don't have a lot of extra time on my hands, I went with the second option. I did some reading online and found that their are many different recipes for natural  homemade deodorant, but they all contained ingredients that I couldn't buy locally. I searched some more and found that some people have reported success by using baking soda mixed with a few drops of essential oils. Baking soda is quite inexpensive, and I wouldn't be losing much if it didn't work well, so I gave it a try. I used Arm and Hammer because I already had it in the baking cupboard and I didn't use any essential oils in mine - just a small bowl of straight baking soda. I think it is interesting that many humans desire to smell like fruit, flowers or other things anyway. I understand that we don't want to smell like stinky humans, but what about clean humans? My daughter smells delightful and I only use unscented castile soap and unscented wipes with her, so that smell is all her own.


The most difficult thing about switching to baking soda is actually applying the baking soda. A stick of deodorant is just so easy and portable. I keep the baking soda in a little bowl near the bathroom sink. To apply it, I get a good pinch of baking soda in my fingers and rub it generously onto my armpits. This works particularly well after showering. I lean over the sink as I apply it, before I put a shirt or sweater on so that all of the excess falls directly into the sink and gets washed away. There have only been a few times when I have been all ready for work and then realized that I haven't used deodorant yet. At that point the idea of disrobing and applying is a bit of a drag but still do-able. I am currently looking for a powder brush or something for applying.

So, how well does it work, you say? I think it works better than the Toms of Maine apricot-scented deodorant that I had been using, which claims that it is effective for 24 hours. At the end of the day, I still smell like a clean human. It does deodorize. It doesn't mask a bad scent with a good one. It is important that I point out that I don't sweat a lot, even when I am running or swimming laps and I also usually don't smell all that bad even when I do sweat (unless I am wearing poly on a hiking/camping trip - that's the exception not the rule). One other benefit to using baking soda is that it doesn't ever burn or itch when applied to shaved pits. I haven't had any staining on my clothing and when I wear black tank tops I check the arm holes and have never noticed any white residue.

Baking soda is not an anti-perspirant, so you will still perspire. It does not contain cancer-causing aluminum or other harmful metals or chemicals. I am still looking for a good way to make it portable. Right now my bowl system isn't convenient to take to the pool or on an overnight trip, simply because a bowl is too bulky for my toiletries bag.

I have found that baking soda works best as a preventative measure, rather than applying it when I *notice* I need it.

Thursday, February 7, 2013

When the baby knocks your coffee over onto the rug...Review of Bac-Out Stain and Odor Remover by Biokleen

My husband came home from an early Saturday morning excursion and brought a rare treat home: coffee with a little bit of hot chocolate in it! Before indulging in his coffee, he decided to play with our daughter for a few minutes on the living room floor. However, one thing led to another and as I was getting myself ready for the day I heard "Wait!.... Too late... Babe?" and then the baby crying.When I arrived on the scene he was blotting with paper towels. I got a wet rag and used that. The floor was still very stained and I was sure it would be permanent...on the living room floor. Awesome. My daughter plays on that rug every day and it is the first thing you see when you walk through the front door. I don't have any carpet cleaner on hand because I can't handle the fumes. Then I remembered this stuff I had bought a while back for cleaning yeast from thrush out of cloth diapers. It also had worked really well for cleaning spit-up off furniture. It is called "Bac-Out Stain and Odor Remover" and it claims that the live enzymes it contains will clean diapers and animal and food stains, among other things. This liquid smells fresh like limes. The caption about it on the Biokleen website states:

Bac-Out’s live enzyme-producing cultures attack pet, food and beverage stains, organic waste, and odors until they are gone, digesting them back to nature, safely and naturally. Bac-Out is safe to use around children and pets, even birds.
• Lime Peel Extract cleaning power
• Destroys the toughest odors so they are gone for good
• Preferred by commercial carpet cleaners nationwide
To treat carpet stains, the bottle says to pour the Bac-Out on the stain until saturated, let it sit for five minutes or more and then blot it with a rag. It says you can repeat the process if necessary. The picture at the top of this page shows the stain on the rug after blotting up the Bac-Out (which I had actually previously diluted with water because I was afraid I would run out and the baby was spitting up everywhere). I admit, I was still a little skeptical. After a day of drying, I could no longer find the stain. The picture below shows the same rug. I know it is the same general region as the stain but I can't say for sure where it was exactly, since there is no remaining discoloration to be found! Why use harsh chemical cleaners when there is a natural alternative that is safe, effective, and smells good?!
 Biokleen also makes many other products that also clean naturally and effectively. I bought our Bac-Out at the health food store for around $9. It is also available from several retailers online for a few dollars less. I highly recommend this product, and I plan to keep it stocked in my cupboards for events such as this!
 
 
It is important to note that I bought the Bac-Out cleaner myself, and that I am in no way affiliated or compensated by the Biokleen company. My opinions and experiences are my own. :)


Wednesday, February 6, 2013

Baby Toothbrushes - Review of Baby Buddy: Baby's 1st Toothbrush

My daughter cut her first tooth at eight weeks.  I couldn't believe it and I nearly cried. About two months later we were at the dentist's office for an appointment for my husband, and our dentist asked me if I had been brushing her teeth. She was exclusively breast-fed, and brushing her teeth hadn't even crossed my mind. He told me that I could rub them with a washcloth or get a soft toothbrush but that I should have started cleaning her teeth the day that her first tooth poked through her gums.


I was previously under the assumption that I should start brushing her teeth when she started eating "real" food. Looking back, I am not sure where this obscure belief came from. I guess I knew that drinking juice and coming in contact with many sugars would be bad for her teeth but I hadn't thought about breast milk.


NUK Infant tooth and gum cleanser
A few days later I remembered that we had received a baby toothbrush for our baby shower, and I dug it out of a box. It is a blue flexible thing that slips onto a parent's finger and it has a patch of gentle and stubby silicone bristles on the area that falls on the pad of the finger. It came in a package with some baby toothpaste, which we passed along to a friend who uses it. We decided to wait on toothpaste until she is at least ingesting other things. The finger toothbrush was a big hit with my daughter. She could have spent hours just gnawing on my finger. I put a little cold water on the brush to begin with and then rinsed with water after each use. My fingers are so narrow that the brush easily slipped off because it wasn't skin-tight. My husband didn't have that problem. The finger brush worked well for the first month or two, but as soon as her teeth were a little bigger, it began to hurt if she chomped down on my finger.


I started looking online for baby toothbrushes. I found an adorable baby toothbrush that is made completely of silicone and looks like a banana. It had awesome reviews and honestly, I was tempted to buy it just for the cute factor. However, once I saw the Baby Buddy: Baby's 1st Toothbrush, I knew that it was the more practical route for us. I ordered this toothbrush in November and put it in Astrid's stocking for Christmas. I can say for sure that it was a huge hit. She loved unwrapping presents and pulling things out of her stocking. In fact, she unwrapped many of her gifts while her toothbrush was hanging from of her mouth.


The toothbrush is entirely made of soft silicone and has a handle that is easy for little hands to grasp. The brush end is an arc-shape. The arc itself is like a sideways "H" and the interior edges are completely covered with silicone bristles. My sweet baby girl loves to bite on it, thus brushing her teeth and soothing her gums for teething. What a brilliant design!
My daughter "brushes" her teeth several times each day, and loves it! She always brushes with supervision, just in case. Being silicone, these toothbrushes do attract hair and dirt very easily, so we rinse with running water before and after each use and store it on the sideboard in the bathroom. These toothbrushes come in clear, pink, and blue. They sell for around $6-$7 on amazon.com, and I believe that they are worth every penny!
Now she has eight teeth!

Cleaning the Shower Doors a New Way

We are blessed to live in an adorable little cabin. We are so happy and comfortable here, and the complaints that I have are few and far between. One of the things that has taken me a while to get used to is the fact that our shower has glass doors instead of a curtain. I am happy that the doors keep the cats (and baby) out of the shower but I feel that they always look dirty. To make matters worse, the shower doors are located directly in front of the toilet, so it is easy to see when they haven't been recently cleaned.

Dirty Shower Door...kind of gross, right?
As I am becoming more and more aware of the chemicals in our home, I am trying to make a concerted effort to change little by little to a more healthy lifestyle by switching to natural alternatives, especially for cleaning products. I had previously been using a bathroom spray that was so strong that I had to hold my breath in the bathroom when I was using it and run frequently into the hall or to the open window to breath. The spray worked like a charm on soap scum, but I was concerned about how harsh it seemed. I then tried switching to white vinegar. The doors looked great while they were wet, but as they dried I could see that the water marks were still there. After that experiment failed I did some digging online and found a suggestion so easy that I had to try it.


Here is what you do: You fill a kitchen sponge that has a reservoir with a mixture of dish soap and white vinegar. Scrub away at the scum on the shower doors. Rinse with hot water to get rid of the bubbles. Done.


I decided to use the ultra concentrated Dawn that we already own. I have switched to a more natural dish liquid, so I was happy to find another use for the Dawn. I wasn't sure of proportions so I just put in a single generous squirt and then filled the rest with white vinegar. I was surprised that cleaning the doors didn't take more elbow grease than it did. Using the sponge, I could feel when the glass became clean and smooth. Rinsing was very easy. As the shower doors dried, I could easily see any areas that I missed because the difference was amazing! I am happy to say that I will not be returning to the world of the fumes!! I have included pictures of the comparison so that you can hopefully see how well this method really works.

Shower door before cleaning
Shower door after cleaning


What other cleaning items can be replaced by safer alternatives? Please share your tips!